School of
Clinical Laboratory SciencesGenetics
The Nitrogen Cycle
A project by Cathy Durbridge and Liz Sockett
Tactile representation of the Nitrogen Cycle
Construction of a representative model
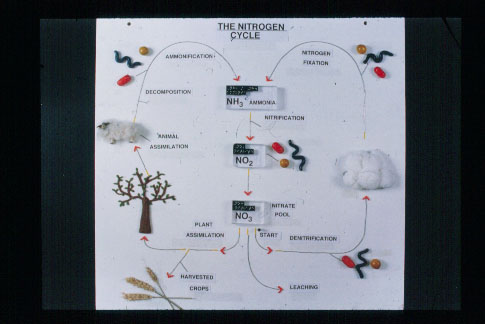
The Nitrogen cycle in diagrammatic form is fairly complex and would be difficult in most cases to follow in a logical manner. The sighted pupil can of course ‘take the whole diagram in’ in one look, so for them a logical approach is not crucial. The visually impaired student on the other hand can only take in one section of the diagram at a time, so it is already a more demanding task. Therefore the cycle had to be simplified, which entailed leaving out some of the extra processes involved in reality, such as the effect of lightning which is generally regarded as an insignificant part of the cycle. The main points of the subject were illustrated in on a wall chart (a method which had previously proven suitable in showing Mitosis and Meiosis). The cycle can be followed by a series of arrows and each section represented by a model which was considered a more interesting way of presenting the information than simply using braille.
Models of the bacteria involved
FIMO proved to be very useful at this stage for model making. It is relatively inexpensive, widely available, easy to use and store, and can be modelled into just about any shape. As well as this, it is available in a number of different colours.
Three different shaped bacteria were made to represent the stages in the cycle where soil bacteria are involved, i.e. decomposition, denitrification, nitrogen fixation and nitrification. The shapes represent the following;
Spherical: cocci (yellow)
Rod shaped: bacilli (red)
Helical: spirila (blue).
The bacilli flagella, which are thin strips of elastic pushed into the FIMO before it was hardened by heating to 120oC. Unfortunately this was not as successful as it could have been as, although the flagella was discernible by touch, some of the elastic threads did not withstand the heating treatment, and melted. A more suitable material therefore, would probably be a thin wire strip, such as that found in pipe cleaners, or in ties for dustbin tags. These would be thin enough to show some flexibility as is found in flagella, but would be resistant to heat.
The same three bacterial shapes were used to represent all of the different stages where bacteria are involved, despite the fact that this is slightly misleading, as in reality different bacterial species are responsible for different stages, e.g. Nitrobacter is responsible for nitrification and Rhizobium is responsible for nitrogen fixation. It would have been too complex to represent this on the cycle itself, so it is explained in the lesson notes.
The Chemical Forms of Nitrogen
The centre of the cycle consists of three raised plastic platforms with Braille labelling on black sticky backed plastic on the top left hand corner, and enlarged print labels below to show the particular forms of nitrogen. Three main forms of nitrogen are shown, Ammonia, Nitrite and Nitrate, and the Braille labels show both the chemical symbols and the written words. The fact that the blocks are raised off the backing board draws attention to them. It was planned originally to put the Braille labels on transparent Braille Dymo tape above the print labelling.
Labelling
All of the labelling is present in both enlarged print and in Braille so it is suitable for both partially sighted and blind students. The print is size 36 as, according to my questionnaire this is a discernible size. The print labels were covered in thin transparent sticky backed plastic purely to increase their durability.
The Braille is done on transparent acetate, using a hand frame and puncher. These labels are consistently placed below the print labels so that they are easy to find. I could not make the labels any bigger than they are as the cycle would look and feel overcrowded. If this was the case, I could have used a key, but I think that it is clear the way it stands.
As well as labelling the processes, the individual models are labelled, the sheep, the trees and the cloud etc., so there is no doubt about their identity.
The Arrows
The arrows were used on the cycle are made of a number of different materials. Small yellow tactile arrows, invented for the prime reason of indicating a set direction to a blind or partially sighted student, are found at the start of each large arrow. They feel smooth if felt in the intended direction and rough if scanned the other way. (This concept was developed during the research project conducted by Schiff and Levi in 1979).
Although these arrows could have been used for the whole of the cycle, they are very small and inflexible and were therefore not ideal. After advice from the RNIB Tactile Diagrams Unit, it was decided to use solder wire. It is convenient for a large scale model, and worked particularly well for the cycle and is very malleable. It is not too heavy and so easily attached to the board, and it is inexpensive and widely available. It was also about the right thickness to connect well to the small tactile arrow units so the arrows could be followed in one smooth movement.
An arrow head was added to the other end of each arrow so as to make them more visually accurate for partially sighted students. A piece of plastic lattice work, cut down to size and sanded down using coarse sand paper was suitable for this. After advice these were painted bright red so they stood out more from the white background of the board. The arrow heads also served to indicate where a model or an important stage in the Nitrogen Cycle had been reached.
The board
Nearly all the information read on producing tactile diagrams emphasised the need for reducing clutter so I followed their advice, and choose a board of one metre2. It is actually a bit heavier than I hoped it would be as it is made from thick wood, but this will increase its durability and any material of that size would be fairly heavy. As it is not for a model that will be carried around, the weight is not a crucial factor.
The board is painted in white matt paint, which protects the wood, while providing the maximum contrast with the enlarged print labels, so they can be read more easily. The edges of the board were sanded down so it is all smooth to the touch.
Attaching the Components to the Board
A strong glue (Araldite) was used to attach the different components to the base board. The labels were attached using Cow Gum. It would have been advantageous to bolt the Perspex blocks on to the board from the back; to increase the durability of the model, but this would disrupt the print labelling. The cloud was attached using Velcro.
The Individual Stages
Denitrification A cloud was used to represent the atmosphere, although this has its disadvantages. The cloud of cotton wool on a cardboard cut out base may be a fairly accurate visual representation, but from a tactile point of view it is not entirely satisfactory. If a cloud is ‘felt’, it is damp and cold, and just that, rather than an actual object that can be grasped. However, it seems impossible to represent this and to make it recognisable to a visually impaired student, so the cotton wool idea was used. Due to the fact that the cardboard and the cotton wool is not durable, Velcro was used to attach it to the board instead of the glue used for other objects. This enables a new cloud to be made and attached in the event that the original one becomes too tattered for use.
Harvesting On the left hand side of the cycle three sheaves of corn are attached to the board to represent crops that have assimilated nitrate from the soil into protein and then have been transferred; therefore where nitrogen is irretrievably lost from the cycle.
Plant Assimilation The model of the tree is made from FIMO and symbolises non-harvestable plant communities that have assimilated nitrates from the soil into plant protein. The tree represents a few problems in that, however it was made it would not feel like the real thing, and could not be made to any sort of scale. Perhaps the tree model is more suitable for the partially sighted student than for the completely blind student.
Animal Assimilation The original idea was to use a cow model, but the sheep was more easily discernible by touch. The plastic sheep from a toy shop lacked a certain tactile aesthetic value so it was covered in some fleece to add an authenticity to it! The back of the sheep was removed to allow it to be fastened securely to the base board by a flat surface.
Tactile DiagramsAlthough the Nitrogen cycle is the main model for this topic, some tactile diagrams were used to help explain aspects considered in the lesson notes.
Tactile Diagram of a Root Hair Cell
A simplified diagram of a root hair cell was used, to show its general structure and outline. This will be useful when the students are considering the formation of root nodules. The diagram was drawn initially, and a key made, and the Braille was added using a Lettroset of transfer dots. This could then be put onto Minolta paper using a stereo copier, to produce a raised diagram.
Root Nodule Thermoform
In order to give some indication of the size and position of root nodules on a leguminous plant a dried example of a clover root network together with thermoform nodules were made.
The master copy was put onto A4 sized card, the roots having been washed and dried. There were some roots with nodules, and some without, so a comparison between the two could be made.
A number of the roots were removed in order to decrease the amount of clutter and background noise in the diagram, and a good example of a root with a large nodule was highlighted so it could be felt more clearly.
In addition a small Minolta diagram showing the positioning of root nodules was made to reinforce the Thermoform model.
Lesson notes accompanying the model can be downloaded by clicking -----------------> here (Word 7)
[ Touching Science ]
[ Making the bacterium ] [ Restriction Endonucleases ] [ Gene cloning models ] [ Nitrogen Cycle ]
Back to Liz Sockett's home page