 |
School
of Clinical Laboratory Sciences |
|
Genetics |
|
|
|
|
Gene cloning models |
|
A Project by Andrew Johnson and Liz Sockett |

| Research into the amount and detail of information
regarding this topic, in general A-Level textbooks revealed the following.
The basic principles behind the gene cloning are outlined, the term recombinant DNA technology is introduced, and the whole aim of gene cloning is explained. The principles behind gene cloning are commonly explained in relation to ‘gene splicing’. The following steps are often described.
It can be seen that the intricacies, and detail of every step are not included, and corresponding laboratory techniques for every step are not mentioned. A raised tactile flow diagram, using stylised representations for bacteria, plasmids and other relevant features appeared to be suitable to relate the above information. A flow diagram could easily depict the sequence of events involved in gene cloning. Problems and solutions in constructing the models The first problem to be resolved was finding a suitable material to represent a simple bacterial cell and Eukaryotic (human) cell from which the plasmid and Eukaryotic DNA could be removed. Acrylic was used because this material could easily be cut in the Life Science Department Workshop, and this material was durable and available in different colours. All shapes which were needed to be cut from acrylic were sketched out as a paper template which could be glued onto the acrylic and cut round. The only features incorporated into these stylised prokaryotic and Eukaryotic cells were simple representations of the genetic material in each cell. Tightly coiled fine wire was used to represent the genetics material because this was easily recognisable through touch. The Eukaryotic cell also had a raised nucleus which enabled identification of its Eukaryotic nature. Only one linear chromosome was placed in this raised nucleus in order to keep the diagram simple and additionally the size of the plasmid in relation to the host bacterial cell and chromosome was greatly exaggerated to enable easy location and identification of this key feature. The next step of the tactile flow diagram was designed to be interactive, because this step showed the main feature of gene cloning (the exscition of DNA from the Eukaryotic genome and ligation into the plasmid vector forming a recombinant plasmid). The enlarged plasmid DNA and Eukaryotic DNA were made from different colours of acrylic allowing differentiation of the two via use of the light or, colour probe. The problem of how to distinguish the segments of Eukaryotic DNA which contained the gene to be cloned was overcome by using self adhesive velvet patches to represent different genes. The interactive nature of the diagram enabled the student to actually create the recombinant plasmid whilst following the scheme of events. The method of using magnets to allow transfer of different segments of DNA was used because it allowed simple movement of the DNA and easy insertion of the gene into the plasmid via alignment of the sticky ends (represented by a stepped cut at each end of the DNA). Once the velvet textured gene has been placed in the plasmid, the next problem was how to continue to represent the Eukaryotic gene in the plasmid, once the plasmid had been placed back into the stylised bacterial cell. This was represented by a pipe cleaner, formed into a circle, with all but a small section of the soft textured cleaning material having been burnt away. Hence a small soft textured part of the plasmid remained which correlated with the velvet textured gene which had been placed in the plasmid during the previous step. The first division of the bacteria, complete with recombinant plasmid, was shown to demonstrate the doubling in amount of recombinant plasmid therefore doubling in the number of clones of the Eukaryotic gene every time the bacterial cell divides. It was during the initial visit to New College that it was discovered that one way tactile arrows could be purchased from the RNIB; These were obtained and used on the diagram. The accompanying information for this diagrams was in the form of the following pre-recorded commentary, which enabled the full attention of the student to be direct to the model. The following commentary was recorded onto an easy to use Dictaphone. " With the diagram infront of you feel towards the top left corner, there is a shape which represents a bacterial cell complete with a plasmid and a chromosome. The chromosome is on the left and is much more bent and twisted that the simple circle shape of the plasmid on the right. OK from this bacteria there are tactile arrows leading down to what represents an enlargement of the plasmid. This is the first step of gene cloning which is the removal of the plasmid from the bacteria. This is done with millions of bacteria at the same time though, not just with the one cell shown here. If you feel towards the top right hand corner there is a shape representing a Eukaryote on the diagram. From this cell there is a short arrow leading down to what represents an enlarged bendy section of the Eukaryotic chromosome. On this section of DNA there are three different genes which are represented by the three bands of velvet on the diagram. This section of DNA is removed from the Eukaryote whilst the plasmids are being removed from the bacteria. Now for the section step which can be done on the diagram. Using restriction enzymes, genes are cut from the Eukaryotic DNA on the right and put into the plasmid on the left of the diagram. So feel for the section which can be removed from the plasmid and slide it out of the way, then any of three genes textured with velvet can now be taken from the Eukaryotic DNA and placed in the plasmid. The stepped ends of these DNA fragments represent the sticky ends created by the restriction enzymes and therefore if the same restriction enzyme is used on the Eukaryotic DNA as is used on the plasmids, the genes will fit perfectly into the plasmid, and a ligase enzyme can be used to join the cut ends of the DNA. The plasmid which now contains foreign DNA is termed a recombinant plasmid. The final step of gene cloning is to introduce the recombinant plasmid which hopefully contains the gene you want to clone, back into a bacteria. The arrows leading down from the plasmid show this final step, and lead to a shape which represents a bacteria, into which the recombinant plasmid has been introduced. If you feel at this bacteria there is a chromosome on the left, and the recombinant plasmid on the right. The foreign gene which is being cloned is represented by the soft textured part of the plasmid. The bacteria has been transformed by the plasmid. Once the bacteria has been transformed, every time it goes through the cell cycle a copy of the plasmid is made and can be found in every daughter cell. This means that the recombinant plasmid, which hopefully contains the recombinant gene you want to copy increases in number, making many clones of the gene. On the diagram there are two arrows leading away from the transformed bacteria. These arrows represent the first division of the bacteria and lead to two daughter cells containing the recombinant plasmid. Bacterial replication and cell division may take less than twenty minutes therefore every twenty minutes or so, twice as many plasmids and therefore twice as many clones of the gene are produced".
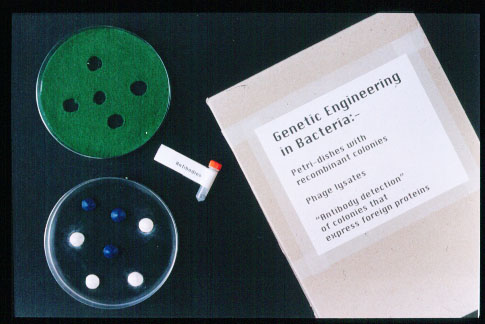
Example of tactile bacterial colonies and phage lawn used in gene cloning Although not completely relevant to the syllabus, and in excess to the base level of knowledge outlined in various A-Level standard text books, it was decided to outline a few of the problems which are encountered during the procedure of gene cloning, and how these problems are overcome. This was done to allow a greater insight into the techniques used in Biotechnology which may help the visually impaired students in future study of biology and give them a good base knowledge of this topic. The notion of R-plasmids and Lac-Z genes were chosen to be introduced in the form of ‘genes on plasmids which allow the bacteria to grow on media containing antibiotic’ and ‘genetics colony colour markers’; And it needed to be simply outlined how these genes were used as ‘tools’ to solve the problems which occur during gene cloning. (The full mechanism of how interruption of the Lac-Z gene causes build up of an intermediate in the biosynthesis pathway when bacteria are grown on X-Gal media, turning the colonies white was regarded as a too detailed an account of events.) The two common problems with respect to the outcome of gene cloning (the unsuccessful transformation of bacteria by a recombinant plasmid, and the unsuccessful formation of a recombinant plasmid) were decided to be explained in relation to the use of the ‘genes on plasmids allowing bacteria to grow on media containing antiobiotic’ and ‘genetic colony colour markers’. The format of Minolta paper diagrams appeared suitable to explain these problems and solutions because they were easily produced, and allowed representation of simple shapes such as plasmids containing different genes. Simple diagrams were produced on a computer drawing programme which could then be printed out, and photocopied onto Minolta paper in order to be passed through the appropriate machine to create the tactile nature of the diagram. It was decided that three stylised diagrams would be produced and each diagram would depict one possible outcome of gene cloning with respect to the presence or not of a plasmid in the bacteria (whether the bacteria had been transformed or not) and whether the plasmid in the bacteria contained a gene which is wanting to be cloned (whether the plasmid was recombinant). The use of Minolta paper allowed different types of hatching to be used to represent different genes on the plasmid. A simple key was included in these diagrams. To emphasise the usefulness of ‘colony colour markers’ (Lac-Z gene) and to give the Visually impaired student an idea of the morphology of bacterial colonies, large petri dishes were used, colonies were moulded from ‘fimo’ modelling clay, and were glued to a petri dish. Fimo was ideal for this purpose because blue and white fimo is available which correlates with the colour of bacterial colonies with and without recombinant plasmids, and fimo could be moulded into a typical ‘entire, convex’ form of a bacterial colony. A petri dish relating to each of the three Minolta paper diagrams was produced. To show that a variety of outcomes can occur from one gene cloning experiment an additional petri dish was made. This contained a random mixture of white and blue colonies. Another problem which arises during gene cloning, and its solution, was incorporated into this petri dish containing a mixture of blue and white colonies. This problem being that genes other than the gene which is wanting to be cloned can splice into the plasmid. Antibody detection of the colonies which are expressing the cloning gene could be demonstrated at this point. A mechanism was therefore required which would allow material which could represent a monoclonal antibody against the cloned gene produced, bind to a proportion of the blue colonies on the petri dish containing both blue and white colonies. This phenomenon was demonstrated by the use of small magnets being placed beneath certain blue colonies and ball bearings representing the monoclonal antibodies. |
|
[Touching Science]
|